Showing posts with label studios. Show all posts

Monday, November 21, 2011

My Sewing Studio - ideas for making the most of a small space

I've just finished a 3 day clean up of my textile studio and between refolding all the fabrics to prevent fading, sorting colours and boxing threads I decided it was good timing to do a studio blog. We live in a 2 bedroom apartment of about 11 squares (about 102 sq metres) so innovative space consumption is paramount. Cost was a major factor too, so most of the storage ideas are budget friendly.

Click pics to enlarge.

The sewing studio in in a smallish second bedroom with one wall at an odd angle which made organisation a bit tougher. Here's the view from the door:

We live on a main road - so great lighting and an ever changing view. The downside is it's always of traffic and the heat coming in these east facing windows is quite amazing during the warmer months!

The desk is a Horn Magic box - both wings fold into the centre and the entire front and middle fold into the box the TV is on. This doesn't happen often though! The sewing machine shelf is height adjustable with an acrylic insert for flatbed sewing (my machine is currently having a holiday with a technician).
I've found most horn cabinets to position you to either side of the machine needle, I love this one as you can sit right in front and the cutout is large enough for the new, longer throat machines.

The Sew-Easy table and ironing board fit well inside the T shape of the Horn desk.

 A second Sew-Easy table in front of the window provides an alternate work area and also a good spot to photograph smaller artworks from.

 I had a friend make a full acrylic insert for one of the Sew-Easy tables, so when I'm quilting larger pieces there's no gap for them to get caught up in.

An open backed ornament wall display unit purchased from a home-wares store for $20 makes good fat quarter storage and all my fabric glues are kept on top.

Under the right wing a chipboard cube fits a woven basket for plastics while a present from my Mum - the Madeira Treasure chest fits beautifully on top. (All luck here, I made the chipboard cube as a stand for a record player when I was about 16!) The Madeira treasure chest comes filled with the most gorgeous collection of Rayon threads.

I had 3 untreated pin bookcases made and delivered for around $150 each, adding them as I needed the extra storage. The first holds my cotton fabrics, the second threads, synthetic fabrics and yarns and the third all the other bits and pieces. A built in wardrobe with mirrored doors helps to create more light.

All the cotton fabrics are stacked in colour-ways. Handpainted and multicoloured fabrics have their own stack as do very long pieces. The white woven crates hold dressmaking fabrics.

Setting them out this way means I can find a value or colour very quickly and it's easy to see any missing colours - right now I'm low on oranges, bright sky blue and lime greens.

To stop fading i've made a curtain from 100% UV block out fabric and drawn a design on it. I've also made curtains to fit the room with a layer of this block out under a layout of thick upholstery weight fabric. It helps to keep the heat down as well.

The top of the second bookcase has tubs of threads sorted into type (I have separate tubs for cotton, wool, poly, metallic, decorative extra-thick, spools, bobbin weight, viscose, silk and rayon). Rayon felts are on the top shelf with synthetics and organzas underneath.

I use very sheer organza for layering and doing heat work. These are too slippery to stack so they are folded according to shade and pushed tightly into plastic boxes. This makes them easier to take out to the kitchen which is handy as I use the flat glass hot plates to do my heat gunning and soldering iron work.

More threads boxed according to type.

Thicker synthetics I keep on a separate shelf and are often used mixed with cottons for art quilts or in my burnt works. These shelves could do with a re-fold too! Being slippery it's hard to get them perfect.

Boxes house yarns for the embellishing machine and couching. More woven crates  hold upholstery and fabric samples plus clothing items from opshops etc that can be repurposed in burnt works.

The third book shelf has plenty of boxes from a $2 store that I have labelled. These hold notions, UFO's, roving and the like.

My Babylock overlocker and Pfaff embellisher sit in the bookshelf when not in use.

Scraps have been organised in snap lock bags according to colour range and then put in these tubs for doing small fused pieces and confetti quilts.

A coat rack found in the bin room on our floor makes a good hanger in a space that would be otherwise too narrow to use for anything else.

An old stretch canvas painting forms a makeshift pin board for displaying some of my smaller works.

I've tacked a large piece of white flannelette to the wall to use as a design board. I love how most fabrics just cling to it without pins and it helps me to keep an eye on the bigger picture while making components for a work. When not in the middle of a large project I can use it as hanging space.

The floor lamp is a $30 uplight that was capable of taking a 100w globe from Bunnings and is essential when sewing at night. I've also put a fluro tube above the middle bookcase.

Even behind the door is utilised with hooks for handbags (there's just no-where else to keep them!) and large watercolour paper. The polystyrene is used to bounce light for photography when there's not enough even light naturally.

On the left hand side of the wardrobe a repurposed bedside tables has stacked racks on top holding all the silks i've collected while travelling. Sadly these have to share with my hubby's pants as the wardrobe in the bedroom is stuffed tighter than an emo band lead singer's pants.

The top of the wardrobe shares towels with Coco the wonder dog and rather inexplicably a basketball- all my wool fabrics and synthetics that don't seem to fit in anywhere else are stuffed into a crate here.


The bottom RHS of the wardrobe fairs a little better - battings and anything else on bolts or in rolls fills up the corner including Lutrador, Tyvek and bamboo sheets for felting. Novelty fabrics are folded into a box on their left which sits on the very large pieces or white on white and black and black backing fabrics I have.

The top of the wardrobe has flannelettes and a box of mending.... almost out of sight out of mind :)

Colorbond Steel fabric painting area with brushes in stainless cutlery containers and paints in CD shelving (both Ikea).

For painting fabrics I've set up a panel of Colourbond Steel in the lounge room. The coating Colorbond has means it won't rust and gives the metal a nice smooth service to work on. It's non porous so paint and water sits on top and nothing sinks in - so while it can stain it's easy to clean. To make it sturdier I used silicon glue to adhere two pieces of L shaped aluminium tubing from the widest part at the bottom to the centre of the top. This cuts down on wobbles and ensures it stays in place. Wet fabric can be smoothed onto the steel and stays in place even when dry - but to help ensure it doesn't start to peel off I use some magnetic vinyl strips or other fridge magnets. A sheet of thick clear plastic sits underneath with the length rolled up in front. When the board is in use it's simple rolled out to protect the carpet.

Besta CD/DVD storage from Ikea makes great fabric paint and marker storage. We have gone digital files only with CD's so it was nice to find a second use for these shelves.

Sunday, April 11, 2010

Interview series: Mixed Media Artist, Jane Davila

This weeks interview is with US based mixed media artist, writer, tutor and general all round star – Jane Davila!


Jane writes a regular business and marketing column for Quilting Arts Magazine (my favorite textile mag), has produced 3 really informative books (her 3rd 'Jane Davila's Surface Design Essentials' is just out) and teaches workshops internationally. On top of all of this she somehow manages to fit in making and selling her own art, designing websites, taking her patchwork store on tour to expos around the states and has guest starred on Quilting Arts TV. Not to mention taking the time to fill in interviews for little known Australian blogs :)


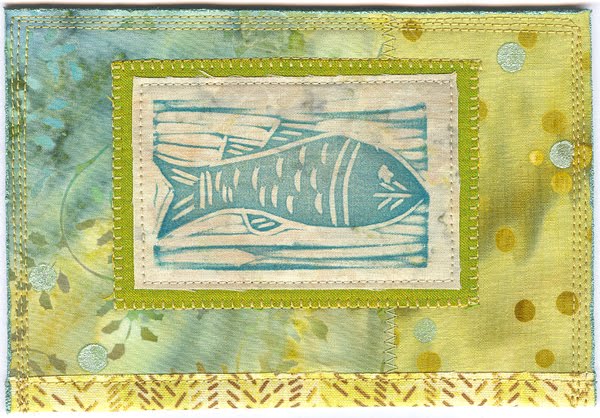
'Woodcut Fish' fibre art postcard 4"x6"
Click to enlarge pic
Cotton fabrics, block print, acrylic ink and pearlescent ink, metallic acrylic paint

 1. How long have you been quilting and what first drew you to it?  
I started out as a printmaker and came to quilting when my mom and I opened a quilt shop, The Country Quilter, in 1990 where I got a really good grounding in all of the basic quiltmaking techniques. I love the tactile quality of quilts, it's the same thing that drew me to printmaking – the texture and colors and hands-on processes.


'Strings' 6"x6"
Small fiber piece mounted on stretched canvas, cotton & silk fabrics, stamp, acrylic ink, linen floss

  2. How would you describe your style now? 
I'm definitely an art quilter although I still make pieced quilts occasionally for fun.

 3. How has your style evolved? 
I began with traditional quilts and quickly progressed to more contemporary quilts. Then in 2002 I began making art quilts when I realized that I could bring my art training and quilt training together. My studio space has been set up with my style of work in mind, so that all my favorite materials are close to hand.


Jane's gorgeous studio features lots of natural light, bookcases packed with stunning natural fabrics, paper displayed over rods and a dozen other things I could really get used to having around! Jane made most of her studio furniture herself including the floating workspace in the centre of the room. See her blog for a how she did it here.


 4. Apart from creating art what else to you do within the industry? 
I write books about art quilting for C&T Publishing (book #3, Surface Design Essentials, just came out!), I teach internationally, I write a column for Quilting Arts magazine called Minding Your Business about the business side of being an artist, I teach online courses as well as workshops in my studio, I have a blog, I tweet and I've got several products in development for the art quilting market. I have a sorely-neglected etsy store and I design websites for artists and others. What I don't have enough of is hours in the day for all the ideas in my head!


Last year in March my Mom and I closed our retail store after nearly 19 years. She has retired with my dad (and is finally getting the hang of it!) and I have taken our shop online and out on the road, vending at quilts shows around the country. Flourish, the name of my art quilting supply company, can be found at www.countryquilter.com

'El Diablito' 5.5" square
Cotton fabrics, hand-dyed wool, Loteria playing card, distress inks, hand and machine stitched

 5. What's the best advice you could give someone who wants to try quilting or textile art for the first time? 
Start with a manageable-sized project. Don't start with a king-sized quilt! I think that if you have a positive first experience and you finish what you start in a reasonable amount of time, you'll be more likely to continue than if you bite off too much and get discouraged.

 6. Do you exhibit your work? 
I do. I no longer apply to quilt shows and have much more luck with all media or mixed-media shows. As my work diversifies and moves farther away from traditional quilts, I find that gallery venues are better choices for me. I also work small and my work gets lost at regular quilt shows hanging next to bed quilts whereas galleries and art centers are better equipped to deal with making small work look great.


'La Sirena' 5.5" square
Cotton fabrics, hand-dyed wool, Loteria playing card, stamped text, hand and machine stitched


 7. How do you go about finding and selecting exhibitions? 
I subscribe to a couple of art magazines that list calls for entry and I haunt the internet – it's a tremendous resource for finding shows.

 8. Do you belong to any quilt associations? If so why did you join these ones? 
I belong to Studio Art Quilt Associates (SAQA) and Surface Design Association (SDA) as well as the Nature Printing Society. I had let my membership to some local fine art guilds lapse due to lack of time and funds but plan to re-join this year. I try to find groups of like-minded people, although I don't tend to be a big joiner. I do also belong to some interesting online groups for assemblage and collage artists.


 9. What would you recommend people do who want to seriously get into textile art? 
Study a wide variety of techniques to start to narrow down where your specific interest lies. Take classes from a number of teachers in different venues if you can. Remember that once you've learned and mastered various aspects of your craft it is necessary to produce a lot of work on a consistent basis to develop your "voice", your unique viewpoint. Take in lots of information from lots of sources, internalize and process it and let it out as your original expression. Keep the parts of what you learn that work for you and discard what doesn't.


 10. What inspires you?  
So much! Color combinations in magazines and art, music, lyrics, poetry, nature, words. I carry a little Moleskine sketchbook with me and constantly doodle in it.

 11. What sewing machine / threads etc do you use? 
I have an old Bernina that I adore. It does just enough and doesn't do anything unnecessary for me. I love cotton threads for machine sewing, especially hand-dyed and adore linen thread for hand stitching.

 12. Do you have any formal art training? Do you think it's necessary? 
I am almost entirely self-taught and I continue that education every day. I am endlessly curious about art and life and science and spend a lot of time studying and researching. I do think that having a solid grounding in the basics of art are absolutely necessary to create successful artwork. 


'Anodyne III' 9"x12"
Mixed media fiber collage, cotton fabrics, paper and paper mesh, image printed on linen fabric and hand-colored, stamped text, distress inks, mah-jong tile, over-printed with found objects, hand and machine stitching, chunky zipper edging

 14. What's the most rewarding thing about your career? 
I love teaching and getting a chance to encourage people to try new things and challenge themselves. I love creating art and pushing myself to explore.

 15. How did you learn the techniques you use? 
I learned my basic quilting skills from my mom and from books. Art quilting techniques I learned by experimentation, from books and the internet.

 16. What are your favorite / least favorite parts of the quilting process?
I like the composing part the best, where I audition fabrics, cut and lay out pieces and start thinking about the quilting lines. I like edge-finishing the least so I don't often use traditional bindings on my quilts.

 17. What is your favorite technique? 
I love to paint on fabric. I don't have the patience for dyeing fabric and I try to avoid toxic chemicals and processes in my work, so painting with acrylic paints and inks suits me. I can get a lot of the same effects that dyers get with my paints and inks and there's little to no prep, no setting and no hazardous materials or dust masks involved. To get a beautiful background wash on fabric I add a small amount of acrylic paint or acrylic ink to a container of water and simply brush it onto prewashed white fabric. I can use more than one color, I can throw sea salt on the wet paint for star burst effects and I can scrunch, fold or lay the wet fabric over a surface for even more textural interest in the finished fabric. The paint or ink changes the hand of the fabric only minimally and is as permanent as dyed fabric. And I can whip up as small or as large a piece as I need in exactly the color(s) I need.

'Gyotaku' 7.5"x9.5"
Mixed media collage on bristol board, printed mulberry paper, gyotaku print on cotton fabric, stamped text, transfered text, embossed and printed papers, cotton fabrics

 For more on Jane: 

Books (all available through C&T Publishing):
• Art Quilt Workbook (co-authored with Elin Waterston)
• Art Quilts at Play (co-authored with Elin Waterston)
• Jane Davila's Surface Design Essentials

DVD's:
• One-Page Book (Quilting Arts workshop dvd)
• Jane & Elin Teach You Art Quilting Basics (C&T Publishing)

You can purchase autographed copies of all Jane's books, or sign up (if you're quick, it's just started!) for her online 'Jump Start Your Art Career' course by emailing Jane.

View more of Jane's work on her website or check out her etsy store.

I love feedback! Please comment below if you have any thoughts on this article or what you'd like to see more or less of in future interviews. –Neroli Henderson

Share

Saturday, February 20, 2010

Studio Clean Up

Part of my getting back into creating this week was a huge sewing studio clean up. I only have a smallish second bedroom for a studio and the work surface had become hard to find. Fitting in the new silks (previous blog) was going to be impossible in my overfilled bookcases. Because space is at a premium keeping it organised is a must.

I had purchased three 6' tall pine bookcases to house my stash, but was worried about all the natural fibre fabrics in the first one fading. I'd made block out curtains to for both windows in the room to reduce both light and heat, but needed something more for when I was working during the day. I put up a sheet of plain 100% UV block out curtain lining (plastic side out) as a book case curtain to prevent fading and drew a design with black pigment texta (waterproof) to dress it up a bit.

So here's some pics of what my sewing studio looks like now. There's still a few things that can be finessed but I'm really happy I managed to fit everything into the first bookcase and I like the curtain. It's easy enough to push out of the way for when I want to pick fabrics while keeping light away from them the rest of the time.

1. The  first bookcase. Everything that didn't take up the full shelf width was refolded giving me extra height to put the new fabrics in. Dress making fabrics are in the white baskets, silks on the 2nd draw and cottons from there up. Fat quarters that won't fit with the rest and novelty fabrics are all on the top shelf and boxed so I can easily take them down when I'm after that sort of thing. The second photo shows the curtain I put in front to prevent fading with the pigma pen design drawn on.


2. The second bookcase holds all my synthetic fabrics and rolls of stabilisers along with some boxed UFO's. All my smaller threads are sorted by type in plastic containers on the 2nd top shelf (cottons in one, rayons in another etc). I have other plastic containers for things like Textiva films and Angelina fibres which makes it really easy to get things out as I need them.

The third bookcase holds my Babylock overlocker (no tension settings, sigh!) and embellisher. One large pink box has snap lock bags filled with scraps. I've sorted them by colour so if I'm doing something like fused applique I can quickly grab whichever colour I'm after and sort through until I find the perfect fabric.

I labelled cardboard boxes from the $2 shop for things like ribbons, heat tools, rovings, buttons etc.


3. My sewing areas. I saved up for an all in one LCD TV as I was putting off sewing when there was a good movie or whatever on... and I tend to get bored with no other stimuli. This seemed like a great idea but the DVD player inside it recently broke and it only had a SD tuner....so now I have those things separate next to it. Still for all the times I don't put off sewing now it's worth it :)

My desk is a Horn 'magic box' - it's 2m wide and long in a T shape, but the sides fold up and the machine pushes down before the whole thing rolls into the box with the TV on top. This means I get to maintain a spare room (well kinda) for when people stay, by putting an air bed in there. One of my sew easy tables fits nicely into the gap of the T which is really handy for taking the weight of larger quilts. One of my friends made an acrylic template that covers the entire hole in the top so it makes a good work surface for painting or drawing when it hasn't got one of the other machines in it.

There's a second sew easy table against the window on the left but the machine for that one tends to live underneath most of the time. the stack of things on top are all things that need to be finished soon. When I'm working on a very large quilt I move this one out and put it to my left - so it carries the weight of the quilt before it hits the sewing desk.


4. My design wall is just a large piece of flannelette that I cut some holes in the top and put over picture hooks. It has the strips from a much earlier blog on it as I still haven't worked out what to do with them! I supplement the rooms lighting (which is pretty average since there's only one downlight for the whole room!) with the floor lamp - it was a whole $30 from Bunnings, takes a 100w globe and makes a huge difference.


On the other side of the sewing machine is a built in robe with all my waddings and a chest of drawers with various stabilisers / web etc. However you really don't want to see that as is subscribes at least a little to the 'push and close before anything falls out' school of organisation :)

I still do all my wet work (painting mostly) in the lounge area where I have easels set up and store all art equipment including fabric paints. For painting fabric I use a piece of colourbond steel as an easel. You can see my old set up which includes this easel in an old blog post on my website here: http://web.me.com/eiloren/eiloren/blog/Entries/2007/10/28_My_sewing_area.html

Hope this gave you some ideas of what's possible in a quite small room.